지난 챕터에서는 유니티 아셋 스토어에서 자모라는 로봇 캐릭터를 공짜 구매, 유니티의 씬에 배치해보았었습니다.
유니티 3D - 아셋 스토어 캐릭터 사용하기
지난 시간에는 마우스 휠을 굴려 카메라를 줌인, 줌아웃하는 방법에 대해 다루어 보았었지요? itadventure.tistory.com/403 유니티3D 마우스 휠로 Zoom In/Out 지난 닉네임 같은 크기 글씨에 이어 이번에는
itadventure.tistory.com
이번 시간에는 이 캐릭터의 조작방법을 수정해볼텐데요.
점프는 지난번에 해보았으니까 이번에는 좀 색다른걸 해보도록 하겠습니다.
바로 스카이 워킹이라는 건데요.
스페이스바를 누르면 점프하는게 아니라 하늘을 걷도록 하는 겁니다.
우선 이 캐릭터의 스크립트를 열어보도록 할까요?
하이라치(Hierarchy) 창에서 Jammo_Player 를 선택하신 다음,

인스펙터(Inspector) 창에서 화면을 제일 아래로 스크롤하면,
Movement Input Script 라는게 보이실 겁니다.
이게 바로 자모 로봇 캐릭터를 움직이는 스크립트인데요.
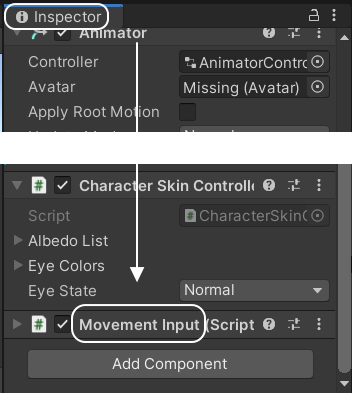
이 스크립트를 편집하시려면 아래와 같이 하시면 됩니다.
제목란을 마우스 우클릭하시고 Edit Script 항목을 선택하시는 것이지요.

그러면 비주얼 스튜디오가 열리며 아래와 같은 스크립트가 보여질 것입니다.
100라인 정도의 비교적 짧은 스크립트인데요.
using System.Collections;
using System.Collections.Generic;
using UnityEngine;

//This script requires you to have setup your animator with 3 parameters, "InputMagnitude", "InputX", "InputZ"
//With a blend tree to control the inputmagnitude and allow blending between animations.
[RequireComponent(typeof(CharacterController))]
public class MovementInput : MonoBehaviour {

    public float Velocity;
    [Space]

	public float InputX;
	public float InputZ;
	public Vector3 desiredMoveDirection;
	public bool blockRotationPlayer;
	public float desiredRotationSpeed = 0.1f;
	public Animator anim;
	public float Speed;
	public float allowPlayerRotation = 0.1f;
	public Camera cam;
	public CharacterController controller;
	public bool isGrounded;

    [Header("Animation Smoothing")]
    [Range(0, 1f)]
    public float HorizontalAnimSmoothTime = 0.2f;
    [Range(0, 1f)]
    public float VerticalAnimTime = 0.2f;
    [Range(0,1f)]
    public float StartAnimTime = 0.3f;
    [Range(0, 1f)]
    public float StopAnimTime = 0.15f;

    public float verticalVel;
    private Vector3 moveVector;

	// Use this for initialization
	void Start () {
		anim = this.GetComponent<Animator> ();
		cam = Camera.main;
		controller = this.GetComponent<CharacterController> ();
	}

	// Update is called once per frame
	void Update () {
		InputMagnitude ();

        isGrounded = controller.isGrounded;
        if (isGrounded)
        {
            verticalVel -= 0;
        }
        else
        {
            verticalVel -= 1;
        }
        moveVector = new Vector3(0, verticalVel * .2f * Time.deltaTime, 0);
        controller.Move(moveVector);


    }

    void PlayerMoveAndRotation() {
		InputX = Input.GetAxis ("Horizontal");
		InputZ = Input.GetAxis ("Vertical");

		var camera = Camera.main;
		var forward = cam.transform.forward;
		var right = cam.transform.right;

		forward.y = 0f;
		right.y = 0f;

		forward.Normalize ();
		right.Normalize ();

		desiredMoveDirection = forward * InputZ + right * InputX;

		if (blockRotationPlayer == false) {
			transform.rotation = Quaternion.Slerp (transform.rotation, Quaternion.LookRotation (desiredMoveDirection), desiredRotationSpeed);
            controller.Move(desiredMoveDirection * Time.deltaTime * Velocity);
		}
	}

    public void LookAt(Vector3 pos)
    {
        transform.rotation = Quaternion.Slerp(transform.rotation, Quaternion.LookRotation(pos), desiredRotationSpeed);
    }

    public void RotateToCamera(Transform t)
    {

        var camera = Camera.main;
        var forward = cam.transform.forward;
        var right = cam.transform.right;

        desiredMoveDirection = forward;

        t.rotation = Quaternion.Slerp(transform.rotation, Quaternion.LookRotation(desiredMoveDirection), desiredRotationSpeed);
    }

	void InputMagnitude() {
		//Calculate Input Vectors
		InputX = Input.GetAxis ("Horizontal");
		InputZ = Input.GetAxis ("Vertical");

		//anim.SetFloat ("InputZ", InputZ, VerticalAnimTime, Time.deltaTime * 2f);
		//anim.SetFloat ("InputX", InputX, HorizontalAnimSmoothTime, Time.deltaTime * 2f);

		//Calculate the Input Magnitude
		Speed = new Vector2(InputX, InputZ).sqrMagnitude;

        //Physically move player

		if (Speed > allowPlayerRotation) {
			anim.SetFloat ("Blend", Speed, StartAnimTime, Time.deltaTime);
			PlayerMoveAndRotation ();
		} else if (Speed < allowPlayerRotation) {
			anim.SetFloat ("Blend", Speed, StopAnimTime, Time.deltaTime);
		}
	}
}
여기서 단 두 부분만을 수정할 것입니다.
첫번째는 낙하속도가 너무 빠르기 때문에 이 속도를 조정할 것이고
스페이스바를 누르면 하늘로 천천히 날아오르게 하는 부분이지요.
내용은 간단합니다.
Update() 메소드에서 캐릭터의 이동을 담당하고 있는데요.
아래와 같은 코드를
if (isGrounded)
{
    verticalVel -= 0;
}
else
{
    verticalVel -= 1;
}
moveVector = new Vector3(0, verticalVel * .2f * Time.deltaTime, 0);
아래와 같이 변경해주시면 됩니다. 2가지를 한꺼번에 수정하는 것이지요.
if (isGrounded)
{
verticalVel -= 0;
}
else
{
verticalVel -= 1 * Time.deltaTime;
}
if (Input.GetButton("Jump"))
{
verticalVel = 0.2f; // 점프
anim.SetTrigger("Jump");
}
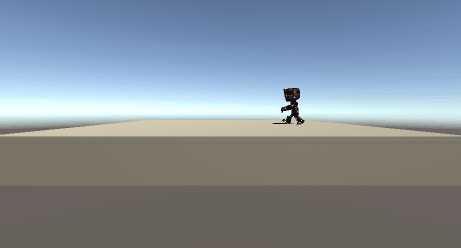
moveVector = new Vector3(0, verticalVel * .2f, 0);저장 후 유니티에서 플레이 시작후 스페이스바를 누르고 있으면
자모 로봇 캐릭터가 하늘로 공중 부양하는 것을 보실수 있을 겁니다 :)
그리고 스페이스 바를 다시 놓으면 바닥으로 떨어지구요.
수정한 부분의 스크립트를 잠깐 설명드리자면,
아래 부분은 캐릭터가 중력의 영향을 받아 아래로 떨어지는 부분인데요.
캐릭터가 떨어지는 속도인 verticalVel 값을 시간의 영향을 받도록 Time.deltaTime 값을 곱해주는 부분입니다.
if (isGrounded)
{
    verticalVel -= 0;

}
else
{
    verticalVel -= 1 * Time.deltaTime;
}
그리고 점프키를 누르고 있으면 앞에서 설정한 속도를 무시하고 하늘 방향으로 0.2의 고정속도로 상승하도록 한 것이지요. 마치 헬륨 풍선처럼 말입니다 :)
if (Input.GetButton("Jump"))
{
    verticalVel = 0.2f; // 점프
    anim.SetTrigger("Jump");
}
수정한 부분은 아니지만 이 값이 반영되는 부분은 바로 아래에 있습니다.
하강하거나 상승하는 값의 벡터를 계산하고,
그 값을 플레이어에게 이동하라고 해주는 것이지요.
moveVector = new Vector3(0, verticalVel * .2f, 0);
controller.Move(moveVector);
그래서 아래와 같은 스카이 워킹이 가능한 것입니다.
간단한 팁 정도의 수정이라, 필요하신 분께 도움이 되셨을지 모르겠습니다.
오늘도 여기까지 읽어 주셔서 감사합니다.
다음 챕터 : 에셋 스토어로 마을을 꾸며보자
https://itadventure.tistory.com/408
유니티 3D - 에셋 스토어로 마을을 꾸며보자!
지난 챕터에서는 에셋 스토어에서 공짜로 구매한 자모 로봇 캐릭터의 스크립트를 수정하는 방법을 살펴보았는데요. itadventure.tistory.com/405 유니티 3D - 아셋 스토어 캐릭터 스크립트 수정 - 스카이
itadventure.tistory.com
'유니티3D' 카테고리의 다른 글
| 유니티3D 벽 뜷고 지나가? 안돼! 콜라이더(Collider) 만들기. (2) | 2021.05.22 |
|---|---|
| 크레이의 유니티 놀이 (2) | 2021.05.16 |
| 유니티 3D - 아셋 스토어 캐릭터 사용하기 (0) | 2021.04.24 |
| 유니티3D 마우스 휠로 Zoom In/Out (0) | 2021.04.14 |
| 유니티3D 플레이어 같은크기 이름표시 (0) | 2021.04.11 |


