오랜만에 구글 로그인을 다룰 일이 있어 코드를 검토해보았는데요.
까먹고 있다 다시 보니 새록 새록 생각이 나네요.

오늘은 PHP 개발자를 위한 내용입니다.
전문적인 내용이 내포되어 있어 비개발자분은 재미없을 수도 있으니 스크롤을 쓱 넘겨 주셔도 됩니다 ㅎㅎ
구글 OAuth 인증을 개발하려면 컴포저를 설치하고
구글 모듈을 설치해 사용하는 방법이 일반적인데요.
사실 구글 모듈 설치하려면 꽤 무겁습니다. 무엇보다 파일 갯수가 어마어마해요.
그런데 이번에 Antigravity 바이브 코딩을 통해 아주 심플한 구글 인증용 PHP 코드를 획득했습니다.
프롬프트는 이게 전부예요.
하지만 AI 코딩은 주사위 굴리기같아서 매번 좋은 결과가 나온다는 보장이 없으니..
php 로 구글 인증 기본형을 구현해줘. 컴포저 사용하지 말고정리해두면 저나 다른 개발자분께 여러모로 도움이 될것 같아 저의 지식창고로 사용하는 티스토리 블로그에 적습니다 ㅎㅎ
소스가 원래 4개였지만 디자인 코드 다 걷어내고 최소한으로 다듬어
흐름을 이해하기 쉽도록 3개의 소스코드로 간소화했는데요.

config.php 는 단지 구글 로그인을 위한 코드를 정의하는 곳입니다.
CLIENT ID, CLIENT SECRET 은 서버 인증 코드를 의미하고,
REDIRECT URL 은 구글 페이지로 이동해 인증을 마친 후 돌아올 URL 인데
이 값을 그냥 정의한 것 뿐입니다. 소스코드는 아래와 같습니다.
<?php
// 클라이언트ID와 시크릿
define('GOOGLE_CLIENT_ID', '...');
define('GOOGLE_CLIENT_SECRET', '...');

// 구글 인증 후 돌아올 url
define('GOOGLE_REDIRECT_URL', 'http://localhost/google_auth/index.php');
GoogleAuth.php 가 꽤 쓸만한데요.
소스코드는 아래와 같습니다.
꼭 필요한 부분만 소스에 포함되어 있어 직접 들여다 보기에도 부담이 없습니다.
<?php

class GoogleAuth {
    protected $clientId;
    protected $clientSecret;
    protected $redirectUrl;

    public function __construct($clientId, $clientSecret, $redirectUrl) {
        $this->clientId = $clientId;
        $this->clientSecret = $clientSecret;
        $this->redirectUrl = $redirectUrl;
    }

    // 1. 로그인 URL 생성
    public function getAuthUrl() {
        $params = [
            'response_type' => 'code',
            'client_id' => $this->clientId,
            'redirect_uri' => $this->redirectUrl,
            'scope' => 'email profile openid',
            'access_type' => 'offline',
            'prompt' => 'consent'
        ];
        return 'https://accounts.google.com/o/oauth2/v2/auth?' . http_build_query($params);
    }

    // 2. 인증 코드로 액세스 토큰 교환
    public function getAccessToken($code) {
        $url = 'https://oauth2.googleapis.com/token';

        $params = [
            'code' => $code,
            'client_id' => $this->clientId,
            'client_secret' => $this->clientSecret,
            'redirect_uri' => $this->redirectUrl,
            'grant_type' => 'authorization_code'
        ];

        return $this->makeRequest($url, $params);
    }

    // 3. 사용자 정보 가져오기
    public function getUserInfo($accessToken) {
        $url = 'https://www.googleapis.com/oauth2/v3/userinfo';

        // GET 요청 헤더에 토큰 포함
        $headers = [
            'Authorization: Bearer ' . $accessToken
        ];

        return $this->makeRequest($url, [], $headers, 'GET');
    }

    // cURL 요청 헬퍼 함수
    protected function makeRequest($url, $params = [], $headers = [], $method = 'POST') {
        $ch = curl_init();

        if ($method === 'POST') {
            curl_setopt($ch, CURLOPT_URL, $url);
            curl_setopt($ch, CURLOPT_POST, true);
            curl_setopt($ch, CURLOPT_POSTFIELDS, http_build_query($params));
        } else {
            // GET
            $url .= '?' . http_build_query($params);
            curl_setopt($ch, CURLOPT_URL, $url);
        }

        curl_setopt($ch, CURLOPT_RETURNTRANSFER, true);

        // 헤더 추가
        if (!empty($headers)) {
            curl_setopt($ch, CURLOPT_HTTPHEADER, $headers);
        }

        // 로컬 환경 SSL 인증서 문제 우회 (배포 시에는 제거 권장)
        curl_setopt($ch, CURLOPT_SSL_VERIFYPEER, false);

        $response = curl_exec($ch);
        $error = curl_error($ch);
        curl_close($ch);

        if ($error) {
            throw new Exception("cURL Error: " . $error);
        }

        return json_decode($response, true);
    }
}
그리고 위 클래스의 사용법에 해당하는 index.php 는 아래와 같은데요.
디자인 코드를 다 걷어내 매우 심플합니다.
<?php
require_once 'config.php';
require_once 'GoogleAuth.php';

$client = new GoogleAuth(
    GOOGLE_CLIENT_ID,
    GOOGLE_CLIENT_SECRET,
    GOOGLE_REDIRECT_URL
);

// 1. Google에서 리다이렉트되어 돌아왔을 때 (인증 코드가 있는 경우)
if (isset($_GET['code'])) {
    try {
        // 인증 코드로 토큰 요청
        $tokenData = $client->getAccessToken($_GET['code']);

        if (isset($tokenData['error'])) {
            die("토큰 에러: " . htmlspecialchars($tokenData['error_description'] ?? $tokenData['error']));
        }
        $accessToken = $tokenData['access_token'];
        $userInfo = $client->getUserInfo($accessToken);
        echo "<pre>";
        print_r($userInfo);
        echo "</pre>";
        die();
    } catch (Exception $e) {
        echo "오류 발생: " . $e->getMessage();
    }
}
?>
<a href="<?php echo $client->getAuthUrl(); ?>" class="btn-google">
    Google 로그인
</a>
처음에 index.php 에 접속하면 로그인 버튼이 나오고

로그인 누르면, 구글로 갔다가
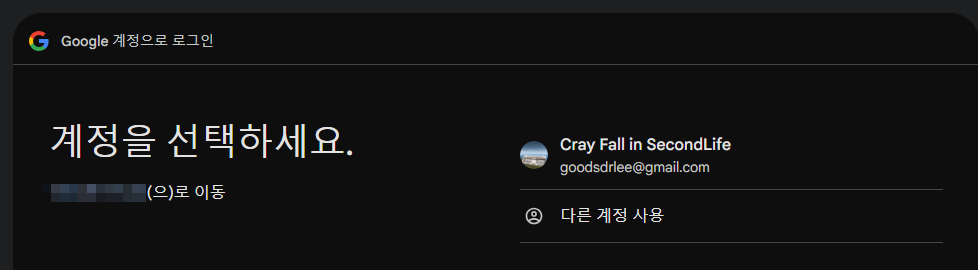
구글 인증을 마치면 if (isset($_GET['code'])) { 문 안쪽이 실행되어 아래 결과가 출력됩니다.

redirect_uri 을 구글에 등록하는 방법같은 건 관련 기술 다루신 분은 다들 아시는 거라 패쓰하도록 할께요!
같은 방법으로 얻은 아주 심플한 페이스북 로그인 코드입니다!

config.php
<?php
// Facebook App 설정
// https://developers.facebook.com/apps/ 에서 앱 생성 후 정보 입력

define('FB_APP_ID', '...');
define('FB_APP_SECRET', '...4');
define('FB_REDIRECT_URI', 'http://localhost/facebook_auth/index.php');
define('FB_GRAPH_VERSION', 'v18.0');
login.php
<?php
require_once 'config.php';

session_start();

// CSRF 방지를 위한 state 토큰 생성
$_SESSION['fb_state'] = bin2hex(random_bytes(16));

// 로그인 URL 생성
$params = [
    'client_id' => FB_APP_ID,
    'redirect_uri' => FB_REDIRECT_URI,
    'state' => $_SESSION['fb_state'],
    'scope' => 'email,public_profile', // 이메일과 공개 프로필 권한 요청
    'response_type' => 'code'
];

$loginUrl = 'https://www.facebook.com/' . FB_GRAPH_VERSION . '/dialog/oauth?' . http_build_query($params);

// Facebook으로 리다이렉트
header('Location: ' . $loginUrl);
index.php
<?php
require_once 'config.php';

session_start();

if (isset($_GET['code'])) {

    // 오류 체크
    if (isset($_GET['error'])) {
        die('로그인 에러: ' . htmlspecialchars($_GET['error_description']));
    }

    if (!isset($_GET['code'])) {
        die('잘못된 접근입니다.');
    }

    // State 검증 (CSRF 방지)
    if (!isset($_GET['state']) || !isset($_SESSION['fb_state']) || $_GET['state'] !== $_SESSION['fb_state']) {
        die('보안 검증 실패 (State mismatch)');
    }

    $code = $_GET['code'];

    // 1. Authorization Code를 Access Token으로 교환
    $tokenUrl = 'https://graph.facebook.com/' . FB_GRAPH_VERSION . '/oauth/access_token';
    $tokenParams = [
        'client_id' => FB_APP_ID,
        'client_secret' => FB_APP_SECRET,
        'redirect_uri' => FB_REDIRECT_URI,
        'code' => $code
    ];

    // cURL을 사용하여 POST 요청 (Composer 없이 구현)
    $ch = curl_init();
    curl_setopt($ch, CURLOPT_URL, $tokenUrl);
    curl_setopt($ch, CURLOPT_POST, true);
    curl_setopt($ch, CURLOPT_POSTFIELDS, http_build_query($tokenParams));
    curl_setopt($ch, CURLOPT_RETURNTRANSFER, true);
    curl_setopt($ch, CURLOPT_SSL_VERIFYPEER, false); // 개발 환경 편의상 SSL 검증 무시 (운영환경에서는 true 권장)
    $response = curl_exec($ch);

    if ($response === false) {
        die('cURL Error: ' . curl_error($ch));
    }
    curl_close($ch);

    $tokenData = json_decode($response, true);

    if (!isset($tokenData['access_token'])) {
        die('Access Token 발급 실패: ' . print_r($tokenData, true));
    }

    $accessToken = $tokenData['access_token'];

    // 2. Access Token을 사용하여 사용자 정보 요청 (Graph API)
    $userUrl = 'https://graph.facebook.com/' . FB_GRAPH_VERSION . '/me';
    $userParams = [
        'fields' => 'id,name,email,picture.width(100).height(100)', // 가져올 필드 지정
        'access_token' => $accessToken
    ];

    $ch = curl_init();
    curl_setopt($ch, CURLOPT_URL, $userUrl . '?' . http_build_query($userParams));
    curl_setopt($ch, CURLOPT_RETURNTRANSFER, true);
    curl_setopt($ch, CURLOPT_SSL_VERIFYPEER, false);
    $userResponse = curl_exec($ch);
    curl_close($ch);

    $userData = json_decode($userResponse, true);

    echo "<pre>";
    print_r($userData);
    echo "</pre>";
    die();
}
?>
<a href="login.php">Facebook으로 로그인</a>
오늘은 구글/페북 OAUTH 인증용 최소한의 PHP코드를 다뤄보았습니다.
필요하신 개발자분께 도움이 되시길 바라며, 사실 제가 써먹으려~
다음번에는 애플 로그인 도전을! 근데 아이폰이 없네요 ㅎ.. 하나 구해야 하려나..
지난번 SQLD 시험을 치루었고 오늘 발표가 났는데요
슬프게도...
:
:
:
합격했습니다! ( 장난을 제가 좀 좋아합니다 ㅎㅎ )

오늘도 방문 감사합니다!
'코딩과 알고리즘' 카테고리의 다른 글
| 오늘 있었던 COS PRO 1급 파이썬 시험 (41) | 2025.12.20 |
|---|---|
| 다음 자격증 도전, COS PRO 1급! (40) | 2025.12.14 |
| chatgpt로 SQLD 시험 준비 꿀팁 (23) | 2025.10.29 |
| 슬로우 쿼리 조사 Shell 스크립트 (46) | 2025.07.30 |
| 워드 편집하는 PHP, 음? (0) | 2024.06.22 |


