※ 이 게시글은 크레이의 IT개발 관련 성장기를 다루고 있습니다. 관련지식이 약간 있어야 이해되실 수 있습니다. 가벼운 마음으로 읽어보시면서 흥미가 생기고 의욕이 생긴다면? 개발자의 자질이 있으신 겁니다 :)

홍드로이드님의 강좌를 정주행하며, 보물들을 건져 올리고 있습니다 :)
강좌 URL : https://edu.goorm.io/learn/lecture/15564/현직개발자가-알려주는-안드로이드-앱-개발/lesson/727135/13-fragment
오늘은 프래그먼트라는 기술에 대한 크레이의 도전입니다.
프래그먼트에 대한 어려운 설명들을 배제하고 크레이가 느낀 주관적인 점을 말씀드리자면,
부분적인 화면요소들을 여러개 만들어 놓고 필요할 때 메인 화면에 끼워 맞춰 쓰는 것입니다.
더 확장된 기능들도 있을 수도 있으니 이 것이 전체 정의는 아닐 수도 있긴 하지만요.
웹으로 보자면, <iframe> 태그, jQuery load 와도 비슷한데요.
리액트의 컴포넌트 수준까지도 가능성이 있는지는 좀 더 두고봐야겠습니다.
위에서 제공된 홍드로이드님의 강좌는 그대로 따라했구요.
안드로이드 돌핀 2021. 3. 1 Patch 1 최신 버전에서도 강좌 내용을 따라하기에 무리가 없었습니다.
최신 버전에서 하나 다른 점이 있다면, 프래그먼트 클래스를 상속받을 때,
선택 클래스가 2개가 나오는 건 동일하지만 그 이름이 Fragment androidx.fragment.app 이라는 것이지요.
이 부분만 주의하면 그대로 문제없이 앱을 만들 수 있습니다.

연습용 예제를 그대로 따라한 것을 글로 쓴다면 크레이가 아니겠지요? :)
기능을 좀 더 붙여 보았습니다.
인트로 화면 구성
첫 화면에 아무것도 보이지 않는 것이 좀 썰렁해서 인트로 프래그먼트를 하나 만들었습니다.
아래와 같은 화면인데요.

MainActivity.java 에서 인트로 프래그먼트를 바로 불러오도록 구성했는데요.
이 방법이 맞을지는 모르겠지만 그냥 해보니 되더라구요.
강좌를 정주행하다 보면 더 효율적인 방법을 찾을 지도 모르겠습니다.
< MainActivity.java 일부 소스 >
public class MainActivity extends AppCompatActivity {
Button btn1, btn2, btn3, btn4;
@Override
protected void onCreate(Bundle savedInstanceState) {
super.onCreate(savedInstanceState);
setContentView(R.layout.activity_main);
// 시작하자마자 인트로 프래그먼트를 불러오는 코드
FragmentTransaction transaction = getSupportFragmentManager().beginTransaction();
Fragment_intro fragment = new Fragment_intro();
transaction.replace(R.id.frame, fragment);
transaction.commit();
:
예쁜 폰트 추가
그리고 화면을 예쁘게 꾸미기 위해 구글폰트에서 제공하는 무료 영문폰트 ZenDots-Regular 폰트를 적용했는데요.

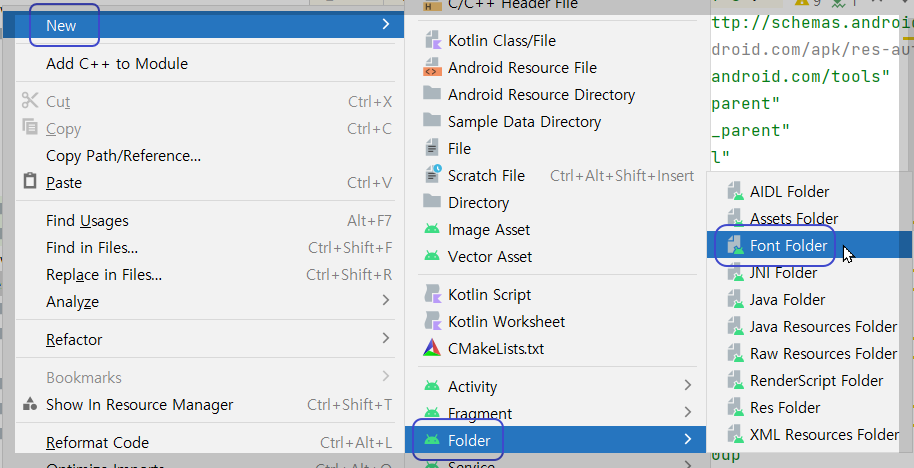
폰트를 넣을 때는 먼저 폰트 폴더를 생성해야 하더라구요.
res 폴더를 마우스 우클릭 - New - Folder - Font Folder 를 선택하면 됩니다.

그리고 윈도우 탐색기에서 파일을 복사해, 이 폴더에 붙여넣어주면 되는데요.

사실 그동안 윈도우 탐색기에서 파일을 드래그해서 놓았는데
한가지 단점이 있는 것이 원본 폴더의 파일이 사라지더라구요.
앞으로는 Ctrl+C, Ctrl+V 로 진행해야 할것 같습니다.

그리고 중간에 에러가 나서 보니, 폰트와 같은 리소스 파일들은 ( 이미지도 마찬가지입니다 )
모두 소문자로 파일명을 바꿔주어야 하더라구요.
비록 나중에 읽었지만 홍드님의 이후 강좌에 나오긴 하는데
처음에 복붙할 때 아래 창에서 이름을 변경하거나

파일명을 마우스 우클릭 - Refactor - Rename 으로 파일명을 변경해줄 수도 있습니다,

크레이 상점 소개 앱
그 외에는 일부 예쁘게 꾸민것 빼고 사실 별 내용은 없습니다 :)
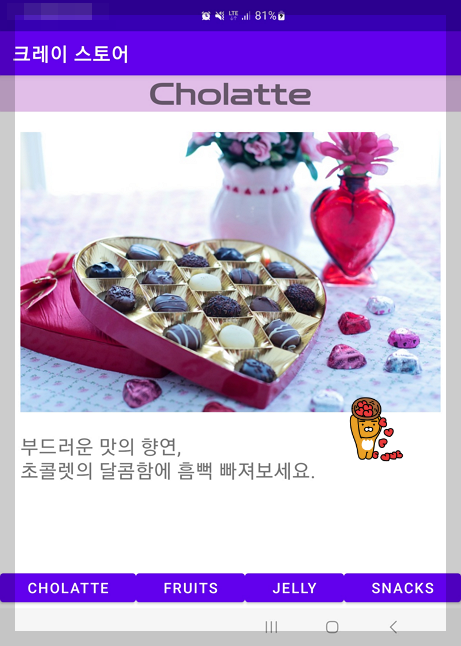
화면 하단의 첫번째 버튼을 클릭하면, 초콜렛 화면이 등장하고,

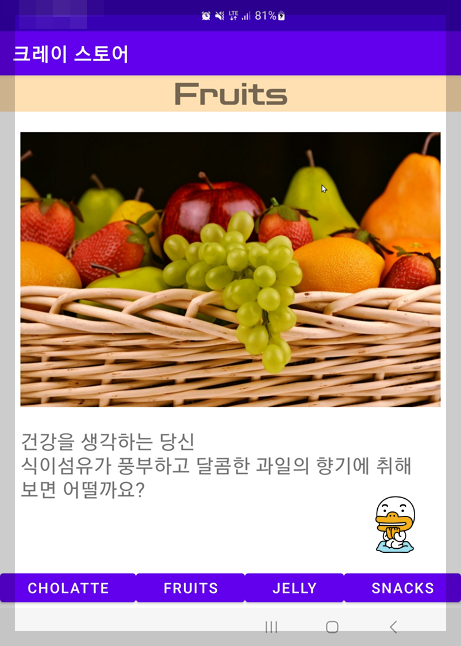
두번째 버튼을 클릭하면 과일 화면이 등장합니다.

이어서 3번째, 4번째 버튼을 클릭하면, 각각 젤리와 과자류 화면이 등장하지요.
이 것이 이번에 연습한 내용의 전부입니다.


각 페이지마다 리스트뷰로 메뉴를 채워넣을까 하다가 우선 강좌를 듣는게 더 나을성 싶어
참았습니다.
필요하신 분이 있을지도 몰라 리소스를 제외한 전체 소스를 싣습니다.
스크롤 압박이 상당하니 예의상 오신 분은 그냥 쭉 넘겨 주세요 :)
소스 공개
activity_main.xml
<?xml version="1.0" encoding="utf-8"?>
<RelativeLayout xmlns:android="http://schemas.android.com/apk/res/android"
xmlns:app="http://schemas.android.com/apk/res-auto"
xmlns:tools="http://schemas.android.com/tools"
android:layout_width="match_parent"
android:layout_height="match_parent"
android:orientation="vertical"
tools:context=".MainActivity" >
<FrameLayout
android:id="@+id/frame"
android:layout_width="match_parent"
android:layout_height="match_parent">
</FrameLayout>
<LinearLayout
android:layout_width="match_parent"
android:layout_height="50dp"
android:layout_alignParentBottom="true"
android:orientation="horizontal">
<Button
android:id="@+id/btn_1"
android:layout_width="wrap_content"
android:layout_height="wrap_content"
android:layout_weight="1"
android:text="Cholatte" />
<Button
android:id="@+id/btn_2"
android:layout_width="wrap_content"
android:layout_height="wrap_content"
android:layout_weight="1"
android:text="Fruits" />
<Button
android:id="@+id/btn_3"
android:layout_width="wrap_content"
android:layout_height="wrap_content"
android:layout_weight="1"
android:text="Jelly" />
<Button
android:id="@+id/btn_4"
android:layout_width="wrap_content"
android:layout_height="wrap_content"
android:layout_weight="1"
android:text="Snacks" />
</LinearLayout>
</RelativeLayout>
fragment_intro.xml
<?xml version="1.0" encoding="utf-8"?>
<FrameLayout xmlns:android="http://schemas.android.com/apk/res/android"
android:layout_width="match_parent"
android:layout_height="match_parent">
<LinearLayout
android:orientation="vertical"
android:layout_width="match_parent"
android:layout_height="match_parent">
<TextView
android:layout_width="match_parent"
android:layout_height="wrap_content"
android:text="Welcome to"
android:textSize="20sp"
android:textAlignment="center"
android:fontFamily="@font/zendotsregular"
android:background="#E1BEE7"
android:textColor="#D500F9"
/>
<TextView
android:layout_width="match_parent"
android:layout_height="wrap_content"
android:text="Cray Store"
android:textSize="30sp"
android:textAlignment="center"
android:fontFamily="@font/zendotsregular"
android:background="#E1BEE7"
android:textColor="#FF6D00"
/>
<ImageView
android:layout_margin="20sp"
android:layout_width="match_parent"
android:layout_height="wrap_content"
android:src="@drawable/craystore"
android:adjustViewBounds="true"
android:scaleType="fitXY"
/>
<TextView
android:layout_width="match_parent"
android:layout_height="wrap_content"
android:layout_marginLeft="20sp"
android:layout_marginRight="20sp"
android:text="크레이의 상점에 오신 것을 환영합니다.\n부담없이 즐기며 보고 가세요."
android:textSize="20sp"
android:maxLines="5"
android:textColor="#000000"
/>
</LinearLayout>
</FrameLayout>
fragment1.xml
<?xml version="1.0" encoding="utf-8"?>
<FrameLayout xmlns:android="http://schemas.android.com/apk/res/android"
android:layout_width="match_parent"
android:layout_height="match_parent">
<LinearLayout
android:orientation="vertical"
android:layout_width="match_parent"
android:layout_height="match_parent">
<TextView
android:layout_width="match_parent"
android:layout_height="wrap_content"
android:text="Welcome to"
android:textSize="20sp"
android:textAlignment="center"
android:fontFamily="@font/zendotsregular"
android:background="#E1BEE7"
android:textColor="#D500F9"
/>
<TextView
android:layout_width="match_parent"
android:layout_height="wrap_content"
android:text="Cray Store"
android:textSize="30sp"
android:textAlignment="center"
android:fontFamily="@font/zendotsregular"
android:background="#E1BEE7"
android:textColor="#FF6D00"
/>
<ImageView
android:layout_margin="20sp"
android:layout_width="match_parent"
android:layout_height="wrap_content"
android:src="@drawable/craystore"
android:adjustViewBounds="true"
android:scaleType="fitXY"
/>
<TextView
android:layout_width="match_parent"
android:layout_height="wrap_content"
android:layout_marginLeft="20sp"
android:layout_marginRight="20sp"
android:text="크레이의 상점에 오신 것을 환영합니다.\n부담없이 즐기며 보고 가세요."
android:textSize="20sp"
android:maxLines="5"
android:textColor="#000000"
/>
</LinearLayout>
</FrameLayout>
fragment2.xml
<?xml version="1.0" encoding="utf-8"?>
<FrameLayout xmlns:android="http://schemas.android.com/apk/res/android"
android:layout_width="match_parent"
android:layout_height="match_parent">
<LinearLayout
android:orientation="vertical"
android:layout_width="match_parent"
android:layout_height="match_parent">
<TextView
android:layout_width="match_parent"
android:layout_height="wrap_content"
android:text="Fruits"
android:textSize="30sp"
android:textAlignment="center"
android:fontFamily="@font/zendotsregular"
android:background="#FFE0B2"
/>
<ImageView
android:layout_margin="20sp"
android:layout_width="match_parent"
android:layout_height="wrap_content"
android:src="@drawable/fruit"
android:adjustViewBounds="true"
android:scaleType="fitXY"
/>
<TextView
android:layout_width="match_parent"
android:layout_height="wrap_content"
android:layout_marginLeft="20sp"
android:layout_marginRight="20sp"
android:text="건강을 생각하는 당신\n식이섬유가 풍부하고 달콤한 과일의 향기에 취해 보면 어떨까요?"
android:textSize="20sp"
android:maxLines="5"
/>
</LinearLayout>
</FrameLayout>
fragment3.xml
<?xml version="1.0" encoding="utf-8"?>
<FrameLayout xmlns:android="http://schemas.android.com/apk/res/android"
android:layout_width="match_parent"
android:layout_height="match_parent">
<LinearLayout
android:orientation="vertical"
android:layout_width="match_parent"
android:layout_height="match_parent">
<TextView
android:layout_width="match_parent"
android:layout_height="wrap_content"
android:text="Jelly"
android:textColor="#FFFDFD"
android:textSize="30sp"
android:textAlignment="center"
android:fontFamily="@font/zendotsregular"
android:background="#FF3D00"
/>
<ImageView
android:layout_margin="20sp"
android:layout_width="match_parent"
android:layout_height="wrap_content"
android:src="@drawable/jelly"
android:adjustViewBounds="true"
android:scaleType="fitXY"
/>
<TextView
android:layout_width="match_parent"
android:layout_height="wrap_content"
android:layout_marginLeft="20sp"
android:layout_marginRight="20sp"
android:text="말랑 말랑한 보석 덩어리들,\n아이들에게 환영만점의 간식이지요."
android:textSize="20sp"
android:maxLines="5"
/>
</LinearLayout>
</FrameLayout>
fragment4.xml
<?xml version="1.0" encoding="utf-8"?>
<FrameLayout xmlns:android="http://schemas.android.com/apk/res/android"
android:layout_width="match_parent"
android:layout_height="match_parent">
<LinearLayout
android:orientation="vertical"
android:layout_width="match_parent"
android:layout_height="match_parent">
<TextView
android:layout_width="match_parent"
android:layout_height="wrap_content"
android:text="Snacks"
android:textColor="#FFFDFD"
android:textSize="30sp"
android:textAlignment="center"
android:fontFamily="@font/zendotsregular"
android:background="#C51162"
/>
<ImageView
android:layout_margin="20sp"
android:layout_width="match_parent"
android:layout_height="wrap_content"
android:src="@drawable/snack"
android:adjustViewBounds="true"
android:scaleType="fitXY"
/>
<TextView
android:layout_width="match_parent"
android:layout_height="wrap_content"
android:layout_marginLeft="20sp"
android:layout_marginRight="20sp"
android:text="바삭 바삭,\n아이 어른 가릴것 없이 누구나 좋아하지요."
android:textSize="20sp"
android:maxLines="5"
android:textColor="#035726"
/>
</LinearLayout>
</FrameLayout>
MainActivity.java
package com.cray.fragmentexam;
import androidx.appcompat.app.AppCompatActivity;
import androidx.fragment.app.Fragment;
import androidx.fragment.app.FragmentTransaction;
import android.os.Bundle;
import android.view.View;
import android.widget.Button;
public class MainActivity extends AppCompatActivity {
Button btn1, btn2, btn3, btn4;
@Override
protected void onCreate(Bundle savedInstanceState) {
super.onCreate(savedInstanceState);
setContentView(R.layout.activity_main);
FragmentTransaction transaction = getSupportFragmentManager().beginTransaction();
Fragment_intro fragment = new Fragment_intro();
transaction.replace(R.id.frame, fragment);
transaction.commit();
btn1= (Button) findViewById(R.id.btn_1);
btn2= (Button) findViewById(R.id.btn_2);
btn3= (Button) findViewById(R.id.btn_3);
btn4= (Button) findViewById(R.id.btn_4);
btn1.setOnClickListener(new View.OnClickListener() {
@Override
public void onClick(View view) {
FragmentTransaction transaction = getSupportFragmentManager().beginTransaction();
Fragment1 fragment = new Fragment1();
transaction.replace(R.id.frame, fragment);
transaction.commit();
}
});
btn2.setOnClickListener(new View.OnClickListener() {
@Override
public void onClick(View view) {
FragmentTransaction transaction = getSupportFragmentManager().beginTransaction();
Fragment2 fragment = new Fragment2();
transaction.replace(R.id.frame, fragment);
transaction.commit();
}
});
btn3.setOnClickListener(new View.OnClickListener() {
@Override
public void onClick(View view) {
FragmentTransaction transaction = getSupportFragmentManager().beginTransaction();
Fragment3 fragment = new Fragment3();
transaction.replace(R.id.frame, fragment);
transaction.commit();
}
});
btn4.setOnClickListener(new View.OnClickListener() {
@Override
public void onClick(View view) {
FragmentTransaction transaction = getSupportFragmentManager().beginTransaction();
Fragment4 fragment = new Fragment4();
transaction.replace(R.id.frame, fragment);
transaction.commit();
}
});
}
}
Fragment_intro.java
package com.cray.fragmentexam;
import android.os.Bundle;
import android.view.LayoutInflater;
import android.view.View;
import android.view.ViewGroup;
import androidx.annotation.NonNull;
import androidx.annotation.Nullable;
import androidx.fragment.app.Fragment;
public class Fragment_intro extends Fragment {
public Fragment_intro() {
}
@Nullable
@Override
public View onCreateView(@NonNull LayoutInflater inflater, @Nullable ViewGroup container, @Nullable Bundle savedInstanceState) {
return inflater.inflate(R.layout.fragment_intro, container, false);
}
}
Fragment1.java
package com.cray.fragmentexam;
import android.os.Bundle;
import android.view.LayoutInflater;
import android.view.View;
import android.view.ViewGroup;
import androidx.annotation.NonNull;
import androidx.annotation.Nullable;
import androidx.fragment.app.Fragment;
public class Fragment1 extends Fragment {
public Fragment1() {
}
@Nullable
@Override
public View onCreateView(@NonNull LayoutInflater inflater, @Nullable ViewGroup container, @Nullable Bundle savedInstanceState) {
return inflater.inflate(R.layout.fragment1, container, false);
}
}
Fragment2.java
package com.cray.fragmentexam;
import android.os.Bundle;
import android.view.LayoutInflater;
import android.view.View;
import android.view.ViewGroup;
import androidx.annotation.NonNull;
import androidx.annotation.Nullable;
import androidx.fragment.app.Fragment;
public class Fragment2 extends Fragment {
public Fragment2() {
}
@Nullable
@Override
public View onCreateView(@NonNull LayoutInflater inflater, @Nullable ViewGroup container, @Nullable Bundle savedInstanceState) {
return inflater.inflate(R.layout.fragment2, container, false);
}
}
Fragment3.java
package com.cray.fragmentexam;
import android.os.Bundle;
import android.view.LayoutInflater;
import android.view.View;
import android.view.ViewGroup;
import androidx.annotation.NonNull;
import androidx.annotation.Nullable;
import androidx.fragment.app.Fragment;
public class Fragment3 extends Fragment {
public Fragment3() {
}
@Nullable
@Override
public View onCreateView(@NonNull LayoutInflater inflater, @Nullable ViewGroup container, @Nullable Bundle savedInstanceState) {
return inflater.inflate(R.layout.fragment3, container, false);
}
}
Fragment4.java
package com.cray.fragmentexam;
import android.os.Bundle;
import android.view.LayoutInflater;
import android.view.View;
import android.view.ViewGroup;
import androidx.annotation.NonNull;
import androidx.annotation.Nullable;
import androidx.fragment.app.Fragment;
public class Fragment4 extends Fragment {
public Fragment4() {
}
@Nullable
@Override
public View onCreateView(@NonNull LayoutInflater inflater, @Nullable ViewGroup container, @Nullable Bundle savedInstanceState) {
return inflater.inflate(R.layout.fragment4, container, false);
}
}
오늘도 찾아와주신 모든 분들께 감사드립니다.
구독과 좋아요는 크레이의 활동에 힘이 됩니다!
'코딩과 알고리즘' 카테고리의 다른 글
| 크레이의 앱개발 도전기 #8. 크리스마스 배경음악 앱 (2) | 2022.12.10 |
|---|---|
| 크레이의 앱개발 도전기 #7. 쓰레드편 (2) | 2022.12.08 |
| 크레이의 앱개발 도전기 #5. 리싸이클뷰 (0) | 2022.12.05 |
| 크레이의 앱개발 도전기 #4. 갤러리에 사진 저장 (2) | 2022.11.27 |
| 크레이의 앱개발 도전기 #3. startActivityForResult 가 없어졌다구?! (2) | 2022.11.26 |


