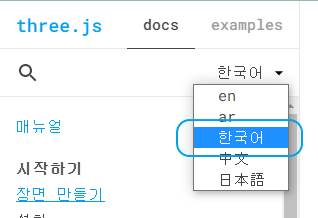
three.js 공식 사이트 한글 문서 제공
언제부터인지는 모르겠지만 3차원 자바스크립트 라이브러리 three.js 공식 문서에 한글이 포함되었습니다.
이로서 좀 더 많은 개발자의 접근이 수월할 것으로 보입니다.
https://threejs.org/docs/index.html#manual/ko/introduction/Creating-a-scene
공식 사이트에서는 npm ( Node Package Manager ) 설치를 권장합니다.
오우~ npm 이면 node.js 인데 새로 익힌 기술을 적용할 수 있게 된 점이 반갑네요.
하지만 공식 문서만 가지고는 사실 어디서 어떻게 시작해야 할지 감이 잘 오지 않을텐데요.
처음부터 시작한다는 가정으로 진행해 보겠습니다.
참고로 이렇게 설치할 때 막강한 three.js의 플러그인들이 대거 설치된다는 점에서 매우 좋습니다 :)
윈도우 PC 에 Node.js 기본 설치
아래 사이트에 방문하신 다음에. 16.14.2 LTS 버전을 다운로드하여 설치합니다.
LTS 는 안정적 버전이란 의미이며 최신 버전이 16.14.2 입니다.
향후 버전이 변경될 수는 있으며 최신 LTS 버전을 다운로드하여 설치하시면 됩니다.

리눅스 CentOS 7 에 Node.js 기본 설치
CentOS 7 에서는 아래 2개의 명령어를 실행하면 Node.js 가 설치됩니다.
curl -o- https://raw.githubusercontent.com/nvm-sh/nvm/v0.39.1/install.sh | bash
nvm install --lts
윈도우 CMD창 OR 리눅스 터미널 접속
윈도우와 리눅스가 방법이 약간 상이하나 거의 비슷합니다.
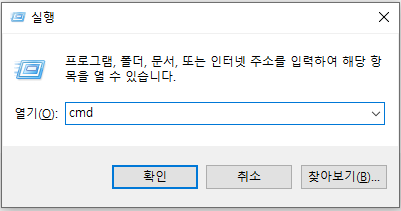
윈도우에서는 윈도우키 + R 버튼을 눌러 cmd 를 입력, Enter 키를 눌러주시면 CMD창에 접속됩니다.
리눅스 시스템 CentOS7 에서는 터미널에 접속하시면 되는데요.
리눅스를 하신다는건 터미널에 접속하는건 기본으로 아신다는거니 건너뛰겠습니다 :)
웹사이트 폴더를 만들어 볼까요?
윈도우 PC라면 CMD창에서 폴더를 하나 생성, 진입합니다.
mkdir threejs_ex1
cd threejs_ex1
리눅스의 경우도 폴더를 생성, 진입합니다.
명령들이 대채로 비슷한데 리눅스의 경우 권한이 있기 때문에 권한을 신경써주어야 합니다.
로그인 아이디는 터미널에 로그인했던 아이디를 말합니다.
sudo mkdir threejs_ex1
sudo chown 로그인아이디:로그인아이디 threejs_ex1
cd threejs_ex1
express / three.js 모듈 설치
이 후로는 윈도우나 리눅스나 동일합니다.
아래 명령어를 입력하여 웹사이트와 three.js 모듈을 설치합니다.
npm -y init
npm i express
npm i three
소스 구성
자 이제 three.js 를 위한 소스를 구성해보겠습니다.
금방 생성한 폴더 threejs_ex1 를 기준으로 아래와 같이 소스를 추가해 주세요.
app.js
| const express = require('express') const app = express() const path = require('path') app.use(express.static(__dirname + '/public')) app.use( '/build/', express.static(path.join( __dirname, 'node_modules/three/build' )) ) app.use( '/jsm/', express.static(path.join( __dirname, 'node_modules/three/examples/jsm' )) ) app.listen( 3000, () => console.log('http://localhost:3000') ) |
public/index.html
| <!DOCTYPE html> <html lang="en"> <head> <meta charset="utf-8" /> <title>Three.js 튜토리얼</title> <meta name="viewport" content="width=device-width,initial-scale=1.0, minimum-scale=1.0,maximum-scale=1.0" /> <script type="importmap"> { "imports": { "three": "./build/three.module.js" } } </script> </head> <body style="margin:0;padding:0;overflow:hidden"> <script type="module" src="client.js"></script> </body> </html> |
public/client.js
| import * as THREE from 'three' import { OrbitControls } from './jsm/controls/OrbitControls.js' const scene = new THREE.Scene() const camera = new THREE.PerspectiveCamera( 75, window.innerWidth / window.innerHeight, 0.1, 100) camera.position.z = 2 const renderer = new THREE.WebGLRenderer() renderer.setSize(window.innerWidth, window.innerHeight) document.body.appendChild(renderer.domElement) const controls = new OrbitControls(camera, renderer.domElement) const geometry = new THREE.BoxGeometry() const material = new THREE.MeshBasicMaterial({ color: 0x00ff00, wireframe: true, }) const cube = new THREE.Mesh(geometry, material) scene.add(cube) window.addEventListener( 'resize', () => { camera.aspect = window.innerWidth / window.innerHeight camera.updateProjectionMatrix() renderer.setSize(window.innerWidth, window.innerHeight) render() }, false ) function animate() { requestAnimationFrame(animate) cube.rotation.x += 0.01 cube.rotation.y += 0.01 render() } function render() { renderer.render(scene, camera) } animate() |
웹사이트 실행!
node.js 는 실행해야만 웹사이트가 작동됩니다.
CMD창 또는 터미널에서 아래 명령을 실행해 주세요
node app.js

그리고 웹 브라우저에서 URL에 접속하시면 되는데요.
윈도우 PC의 경우에는 아래 주소를 접속하시면 되고,
http://localhost:3000
리눅스 서버라면 퍼블릭IP(공인IP)주소로 연결해 주시면 됩니다.
http://퍼블릭IP:3000
아래와 같이 나온다면 성공! 뱅글 뱅글 돌아가요~

위와 비슷한 결과가 보이시나요? 성공하신 모든 분들 축하드리며,
방문해주시는 모든 분들께도 늘 감사드립니다.
도움이 되셨다면 공감 한방, 댓글은 굿잡!
감사합니다~
